Quickstart Guide
This guide will walk you through the steps needed to get started with the Smart Solar API.
1. Retrieve Access Token
Tenants with a subscription to our Smart Solar API will receive ApiKey, client_id an client_secret, that can be used to retrieve a token.
More information can be found in the "Authentication" section.
Example request:
curl -X POST 'https://app.zonnedimmer.nl/api/v1/ssa/oauth/token' \
    --header 'Content-Type: application/x-www-form-urlencoded' \
    --header 'ApiKey: {YOUR API KEY}' \
    --data-urlencode 'grant_type=client_credentials' \
    --data-urlencode 'client_id={your client_id}' \
    --data-urlencode 'client_secret={your client_secret}'
--data-urlencode 'scope=pvcurtailment'No credentials yet?
Contact us to request access to the Zonnedimmer Smart Solar API
2. Register a user
To create a user, send a POST request to /api/v1/ssa/users.
Example request:
curl --request POST \
    --url {DOMAIN}/api/v1/ssa/users \
    --header 'accept: application/json' \
    --header 'ApiKey: {YOUR_API_KEY}' \
    --header 'authorization: Bearer {YOUR_ACCESS_TOKEN}' \
    --header 'content-type: application/json' \
    --data '
{
  "tenantReference": "83504789",
  "gridLocations": [
    {"ean": 871694840001231183}
 ]
}
'
On success, the API will return a response containing the user's id. This id can be used to identify the user, create a new PV Connect Session (step 3) and request data for the user later on.
Example response:
{
  "id": "7ac92c1f-c03c-4804-8125-86650623506b",
  "firstName": "",
  "lastName": "",
  "email": "",
  "tenantName": "Tenant name",
  "tenantReference": "83504789",
  "createdAt": "2025-05-10T11:31:21.203Z",
  "updatedAt": "2022-05-10T11:32:57.150Z",
  "gridLocations": [
    {
      "id": "822bf2bf-8967-4c1f-a9fa-c1d51d490ff4",
      "ean": 871694840001231183
    }
  ]
}
3. Initiate PV Onboarding Session
The next step is to initiate a new PV Onboarding Session for the user.
This new PV Onboarding Session results a unique startUrl for the PV Onboarding Webflow where the PV owner (user) can proceed to authorize his/her PV installation.
Example request
curl --request POST \
    --url {DOMAIN}/api/v1/ssa/onboarding/pv/{gridLocationId} \
    --header 'accept: application/json' \
    --header 'ApiKey: {YOUR_API_KEY}' \
--header 'authorization: Bearer USER_ACCESS_TOKEN' Multiple inverters / inverter brands
Users can connect multiple inverters of one inverter brand in one PV Onboarding Session.
To connect multiple inverters ofdifferent brands, one PV Onboarding Session is needed per inverter brand.
Example response:
{
"sessionId": "846f3e3e-cd7b-4d38-adf1-b0fdda3cccb1",
"finished": false,
"active": true,
"startUrl": "https://tenant.zonnedimmer.nl/pv-onboarding/b26048e891cf7d2b0f40fa57a34c5dda",
"createdAt": "2025-11-18T21:29:45+01:00",
"updatedAt": "2025-11-18T21:29:45+01:00",
"expiresAt": "2025-11-19T21:29:45+01:00"
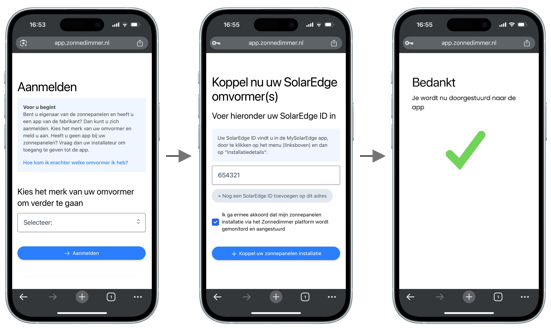
}4. PV Owner completes the PV Onboarding Webflow
The PV Owner performs the steps needed to authorize the PV installation for monitoring and curtailment, using the PV Onboarding Webflow.
The steps needed to authorize the PV installation vary depending on the inverter brand that is selected.
Tenants can check the status / result of the PV Onboarding Session by making a GET request to /api/v1/ssa/users/USERID/pv/onboarding-sessions/{sessionId}, example below:
curl --request GET \
    --url {DOMAIN}/api/v1/ssa/onboarding/pv/{sessionId} \
    --header 'accept: application/json' \
    --header 'ApiKey: {YOUR_API_KEY}' \
    --header 'authorization: Bearer USER_ACCESS_TOKEN'
Depending on the inverter brand, there can be a delay between the user finishing the PV Onboarding Webflow and the actual PV installation becoming available for monitoring and curtailment.
Example response 1:
(PV Onboarding Webflow completed by user, PV installation not yet online)
{
  "sessionId": "846f3e3e-cd7b-4d38-adf1-b0fdda3cccb1",
  "finished": false,
  "active": true,
  "expired": false,
  "createdAt": "2025-11-18T21:29:45+01:00",
  "updatedAt": "2025-11-18T21:30:08+01:00",
  "expiresAt": "2025-11-19T21:29:45+01:00",
  "inverters": [
  ]
}
Example response 2:
(PV Onboarding Webflow completed by user, PV installation online)
{
  "sessionId": "846f3e3e-cd7b-4d38-adf1-b0fdda3cccb1",
  "finished": true,
  "active": false,
  "expired": false,
  "createdAt": "2025-11-18T21:29:45+01:00",
  "updatedAt": "2025-11-18T21:30:29+01:00",
  "expiresAt": "2025-11-19T21:29:45+01:00",
  "inverters":
  [
    {
      "id":
      "a063a22b-b6f5-4c22-9cf6-344fe283e538"
    }
  ]
}
Once one or more inverters are online, PV monitoring data will be collected regularly (every 5 minutes or at the interval provided by the inverter manufacturer).
With the provided userId or inverterId, you can access the data of the inverters (including curtailed kWh's per minute when curtailment is executed) and plan or perform curtailment using the endpoints of the Smart Solar API.
Updated 8 months ago